什么是 OpenTenBase
OpenTenBase 是一个提供写可靠性,多主节点数据同步的关系数据库集群平台。你可以将 OpenTenBase 配置一台或者多台主机上, OpenTenBase 数据存储在多台物理主机上面。数据表的存储有两种方式, 分别是 distributed 或者 replicated ,当向 OpenTenBase 发送查询 SQL 时, OpenTenBase 会自动向数据节点发出查询语句并获取最终结果。
OpenTenBase 采用分布式集群架构(如下图), 该架构分布式为无共享(share nothing)模式,节点之间相应独立,各自处理自己的数据,处理后的结果可能向上层汇总或在节点间流转,各处理单元之间通过网络协议进行通信,并行处理和扩展能力更好,这也意味着只需要简单的 x86 服务器就可以部署 OpenTenBase 数据库集群
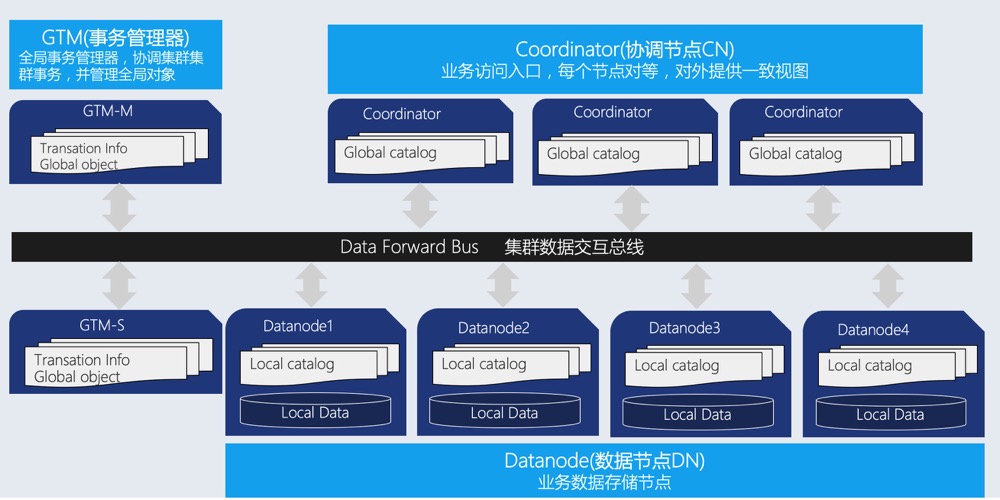
OpenTenBase 架构图
下面简单解读一下 OpenTenBase 的三大模块
Coordinator:协调节点(简称 CN)
业务访问入口,负责数据的分发和查询规划,多个节点位置对等,每个节点都提供相同的数据库视图;在功能上 CN 上只存储系统的全局元数据,并不存储实际的业务数据。
Datanode:数据节点(简称 DN)
每个节点还存储业务数据的分片在功能上,DN 节点负责完成执行协调节点分发的执行请求。
GTM:全局事务管理器(Global Transaction Manager)
负责管理集群事务信息,同时管理集群的全局对象,比如序列等。
接下来,让我们来看看如何从源码开始,完成到 OpenTenBase 集群环境的搭建。
OpenTenBase 源码编译安装
系统要求:
Memory: 4G RAM minimum
OS: TencentOS 2, TencentOS 3, OpenCloudOS, CentOS 7, CentOS 8, Ubuntu
安装依赖
yum -y install gcc make readline-devel zlib-devel openssl-devel uuid-devel bison flex git
或
apt install -y gcc make libreadline-dev zlib1g-dev libssl-dev libossp-uuid-dev bison flex git
创建 opentenbase 用户
注意:所有需要安装 OpenTenBase 集群的机器上都需要创建
mkdir /data
useradd -d /data/opentenbase -s /bin/bash -m opentenbase
passwd opentenbase # set password
- 源码获取
git clone https://github.com/OpenTenBase/OpenTenBase
- 源码编译
cd ${SOURCECODE_PATH}
rm -rf ${INSTALL_PATH}/opentenbase_bin_v2.0
chmod +x configure*
./configure --prefix=${INSTALL_PATH}/opentenbase_bin_v2.0  --enable-user-switch --with-openssl  --with-ossp-uuid CFLAGS=-g
make clean
make -sj
make install
chmod +x contrib/pgxc_ctl/make_signature
cd contrib
make -sj
make install
本文的使用环境中,上述两个参数如下
${SOURCECODE_PATH}=/data/opentenbase/OpenTenBase
${INSTALL_PATH}=/data/opentenbase/install
集群安装
- 集群规划
下面以两台服务器上搭建 1GTM 主,1GTM 备,2CN 主(CN 主之间对等,因此无需备 CN),2DN 主,2DN 备的集群,该集群为具备容灾能力的最小配置
机器1:10.215.147.158
机器2:10.240.138.159
集群规划如下:
| 节点名称 | IP | 数据目录 |
|---|---|---|
| GTM master | 10.215.147.158 | /data/opentenbase/data/gtm |
| GTM slave | 10.240.138.159 | /data/opentenbase/data/gtm |
| CN1 | 10.215.147.158 | /data/opentenbase/data/coord |
| CN2 | 10.240.138.159 | /data/opentenbase/data/coord |
| DN1 master | 10.215.147.158 | /data/opentenbase/data/dn001 |
| DN1 slave | 10.240.138.159 | /data/opentenbase/data/dn001 |
| DN2 master | 10.240.138.159 | /data/opentenbase/data/dn002 |
| DN2 slave | 10.215.147.158 | /data/opentenbase/data/dn002 |
示意图
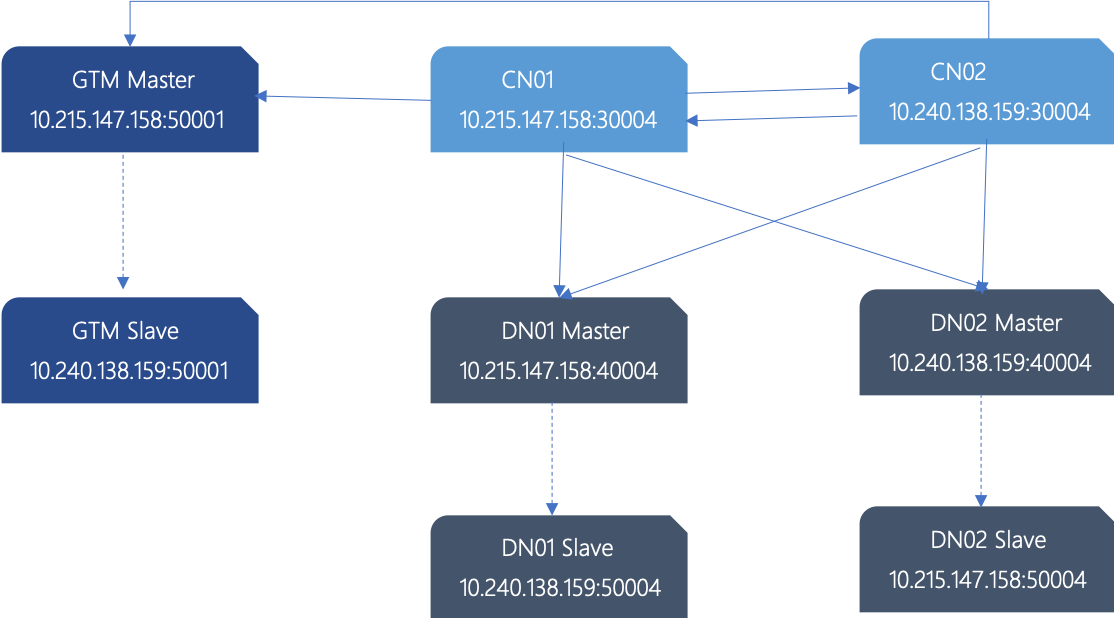 OpenTenBase部署示意图
- 禁用 SELinux 和 防火墙 (可选)
vi /etc/selinux/config # disable SELinux, change SELINUX=enforcing to SELINUX=disabled
# disable firewall, for Ubuntu, change firewalld to ufw
systemctl disable firewalld
systemctl stop firewalld
- 机器间的 ssh 互信配置
su opentenbase
ssh-keygen -t rsa
ssh-copy-id -i ~/.ssh/id_rsa.pub destination-user@destination-server
参考[Linux ssh互信配置](https://blog.csdn.net/chenghuikai/article/details/52807074)
- 环境变量配置
集群所有机器都需要配置
[opentenbase@localhost ~]$ vim ~/.bashrc
export OPENTENBASE_HOME=/data/opentenbase/install/opentenbase_bin_v2.0
export PATH=$OPENTENBASE_HOME/bin:$PATH
export LD_LIBRARY_PATH=$OPENTENBASE_HOME/lib:${LD_LIBRARY_PATH}
export LC_ALL=C
以上,已经配置好了所需要基础环境,可以进入到集群初始化阶段,为了方便用户,OpenTenBase 提供了专用的配置和操作工具:pgxc_ctl来协助用户快速搭建并管理集群,首先需要将前文所述的节点的 ip,端口,目录写入到配置文件 pgxc_ctl.conf 中。
- 初始化 pgxc_ctl.conf 文件
[opentenbase@localhost ~]$ mkdir /data/opentenbase/pgxc_ctl
[opentenbase@localhost ~]$ cd /data/opentenbase/pgxc_ctl
[opentenbase@localhost ~/pgxc_ctl]$ vim pgxc_ctl.conf
如下,是结合上文描述的 IP,端口,数据库目录,二进制目录等规划来写的 pgxc_ctl.conf 文件。具体实践中只需按照自己的实际情况配置好即可。
亦可从此处下载,修改文件名为 pgxc_ctl.conf ,按照实际情况修改内容:
#!/bin/bash
# Double Node Config

IP_1=10.215.147.158
IP_2=10.240.138.159

pgxcInstallDir=/data/opentenbase/install/opentenbase_bin_v2.0
pgxcOwner=opentenbase
defaultDatabase=postgres
pgxcUser=$pgxcOwner
tmpDir=/tmp
localTmpDir=$tmpDir
configBackup=n
configBackupHost=pgxc-linker
configBackupDir=$HOME/pgxc
configBackupFile=pgxc_ctl.bak


#---- GTM ----------
gtmName=gtm
gtmMasterServer=$IP_1
gtmMasterPort=50001
gtmMasterDir=/data/opentenbase/data/gtm
gtmExtraConfig=none
gtmMasterSpecificExtraConfig=none
gtmSlave=y
gtmSlaveServer=$IP_2
gtmSlavePort=50001
gtmSlaveDir=/data/opentenbase/data/gtm
gtmSlaveSpecificExtraConfig=none

#---- Coordinators -------
coordMasterDir=/data/opentenbase/data/coord
coordArchLogDir=/data/opentenbase/data/coord_archlog

coordNames=(cn001 cn002 )
coordPorts=(30004 30004 )
poolerPorts=(31110 31110 )
coordPgHbaEntries=(0.0.0.0/0)
coordMasterServers=($IP_1 $IP_2)
coordMasterDirs=($coordMasterDir $coordMasterDir)
coordMaxWALsernder=2
coordMaxWALSenders=($coordMaxWALsernder $coordMaxWALsernder )
coordSlave=n
coordSlaveSync=n
coordArchLogDirs=($coordArchLogDir $coordArchLogDir)

coordExtraConfig=coordExtraConfig
cat > $coordExtraConfig <<EOF
#================================================
# Added to all the coordinator postgresql.conf
# Original: $coordExtraConfig

include_if_exists = '/data/opentenbase/global/global_opentenbase.conf'

wal_level = replica
wal_keep_segments = 256
max_wal_senders = 4
archive_mode = on
archive_timeout = 1800
archive_command = 'echo 0'
log_truncate_on_rotation = on
log_filename = 'postgresql-%M.log'
log_rotation_age = 4h
log_rotation_size = 100MB
hot_standby = on
wal_sender_timeout = 30min
wal_receiver_timeout = 30min
shared_buffers = 1024MB
max_pool_size = 2000
log_statement = 'ddl'
log_destination = 'csvlog'
logging_collector = on
log_directory = 'pg_log'
listen_addresses = '*'
max_connections = 2000

EOF

coordSpecificExtraConfig=(none none)
coordExtraPgHba=coordExtraPgHba
cat > $coordExtraPgHba <<EOF

local   all             all                                     trust
host    all             all             0.0.0.0/0               trust
host    replication     all             0.0.0.0/0               trust
host    all             all             ::1/128                 trust
host    replication     all             ::1/128                 trust


EOF


coordSpecificExtraPgHba=(none none)
coordAdditionalSlaves=n
cad1_Sync=n

#---- Datanodes ---------------------
dn1MstrDir=/data/opentenbase/data/dn001
dn2MstrDir=/data/opentenbase/data/dn002
dn1SlvDir=/data/opentenbase/data/dn001
dn2SlvDir=/data/opentenbase/data/dn002
dn1ALDir=/data/opentenbase/data/datanode_archlog
dn2ALDir=/data/opentenbase/data/datanode_archlog

primaryDatanode=dn001
datanodeNames=(dn001 dn002)
datanodePorts=(40004 40004)
datanodePoolerPorts=(41110 41110)
datanodePgHbaEntries=(0.0.0.0/0)
datanodeMasterServers=($IP_1 $IP_2)
datanodeMasterDirs=($dn1MstrDir $dn2MstrDir)
dnWALSndr=4
datanodeMaxWALSenders=($dnWALSndr $dnWALSndr)

datanodeSlave=y
datanodeSlaveServers=($IP_2 $IP_1)
datanodeSlavePorts=(50004 54004)
datanodeSlavePoolerPorts=(51110 51110)
datanodeSlaveSync=n
datanodeSlaveDirs=($dn1SlvDir $dn2SlvDir)
datanodeArchLogDirs=($dn1ALDir/dn001 $dn2ALDir/dn002)

datanodeExtraConfig=datanodeExtraConfig
cat > $datanodeExtraConfig <<EOF
#================================================
# Added to all the coordinator postgresql.conf
# Original: $datanodeExtraConfig

include_if_exists = '/data/opentenbase/global/global_opentenbase.conf'
listen_addresses = '*'
wal_level = replica
wal_keep_segments = 256
max_wal_senders = 4
archive_mode = on
archive_timeout = 1800
archive_command = 'echo 0'
log_directory = 'pg_log'
logging_collector = on
log_truncate_on_rotation = on
log_filename = 'postgresql-%M.log'
log_rotation_age = 4h
log_rotation_size = 100MB
hot_standby = on
wal_sender_timeout = 30min
wal_receiver_timeout = 30min
shared_buffers = 1024MB
max_connections = 4000
max_pool_size = 4000
log_statement = 'ddl'
log_destination = 'csvlog'
wal_buffers = 1GB

EOF

datanodeSpecificExtraConfig=(none none)
datanodeExtraPgHba=datanodeExtraPgHba
cat > $datanodeExtraPgHba <<EOF

local   all             all                                     trust
host    all             all             0.0.0.0/0               trust
host    replication     all             0.0.0.0/0               trust
host    all             all             ::1/128                 trust
host    replication     all             ::1/128                 trust


EOF


datanodeSpecificExtraPgHba=(none none)

datanodeAdditionalSlaves=n
walArchive=n
- 分发二进制包
在一个节点配置好配置文件后,需要预先将二进制包部署到所有节点所在的机器上,这个可以使用 pgxc_ctl 工具,执行deploy all命令来完成。
[opentenbase@localhost ~/pgxc_ctl]$ pgxc_ctl
/usr/bin/bash
Installing pgxc_ctl_bash script as /data/opentenbase/pgxc_ctl/pgxc_ctl_bash.
Installing pgxc_ctl_bash script as /data/opentenbase/pgxc_ctl/pgxc_ctl_bash.
Reading configuration using /data/opentenbase/pgxc_ctl/pgxc_ctl_bash --home /data/opentenbase/pgxc_ctl --configuration /data/opentenbase/pgxc_ctl/pgxc_ctl.conf
Finished reading configuration.
   ******** PGXC_CTL START ***************

Current directory: /data/opentenbase/pgxc_ctl
PGXC deploy all
Deploying Postgres-XL components to all the target servers.
Prepare tarball to deploy ...
Deploying to the server 10.215.147.158.
Deploying to the server 10.240.138.159.
Deployment done.

登录到所有节点,check二进制包是否分发OK
[opentenbase@localhost ~/install]$ ls /data/opentenbase/install/opentenbase_bin_v2.0
bin  include  lib  share
- 执行init all命令,完成集群初始化命令
[opentenbase@localhost ~]$ pgxc_ctl
/usr/bin/bash
Installing pgxc_ctl_bash script as /data/opentenbase/pgxc_ctl/pgxc_ctl_bash.
Installing pgxc_ctl_bash script as /data/opentenbase/pgxc_ctl/pgxc_ctl_bash.
Reading configuration using /data/opentenbase/pgxc_ctl/pgxc_ctl_bash --home /data/opentenbase/pgxc_ctl --configuration /data/opentenbase/pgxc_ctl/pgxc_ctl.conf
Finished reading configuration.
   ******** PGXC_CTL START ***************

Current directory: /data/opentenbase/pgxc_ctl
PGXC init all
Initialize GTM master
....
....
Initialize datanode slave dn001
Initialize datanode slave dn002
mkdir: cannot create directory '/data1/opentenbase': Permission denied
chmod: cannot access '/data1/opentenbase/data/dn001': No such file or directory
pg_ctl: directory "/data1/opentenbase/data/dn001" does not exist
pg_basebackup: could not create directory "/data1/opentenbase": Permission denied
- 安装错误处理
一般 init 集群出错,终端会打印出错误日志,通过查看错误原因,更改配置即可,或者可以通过/data/opentenbase/pgxc_ctl/pgxc_log 路径下的错误日志查看错误,排查配置文件的错误
[opentenbase@localhost ~]$ ll ~/pgxc_ctl/pgxc_log/
total 184
-rw-rw-r-- 1 opentenbase opentenbase 81123 Nov 13 17:22 14105_pgxc_ctl.log
-rw-rw-r-- 1 opentenbase opentenbase  2861 Nov 13 17:58 15762_pgxc_ctl.log
-rw-rw-r-- 1 opentenbase opentenbase 14823 Nov 14 07:59 16671_pgxc_ctl.log
-rw-rw-r-- 1 opentenbase opentenbase  2721 Nov 13 16:52 18891_pgxc_ctl.log
-rw-rw-r-- 1 opentenbase opentenbase  1409 Nov 13 16:20 22603_pgxc_ctl.log
-rw-rw-r-- 1 opentenbase opentenbase 60043 Nov 13 16:33 28932_pgxc_ctl.log
-rw-rw-r-- 1 opentenbase opentenbase 15671 Nov 14 07:57 6849_pgxc_ctl.log
通过运行 pgxc_ctl 工具,执行clean all命令删除已经初始化的文件,修改 pgxc_ctl.conf 文件,重新执行init all命令重新发起初始化。
[opentenbase@localhost ~]$ pgxc_ctl
/usr/bin/bash
Installing pgxc_ctl_bash script as /data/opentenbase/pgxc_ctl/pgxc_ctl_bash.
Installing pgxc_ctl_bash script as /data/opentenbase/pgxc_ctl/pgxc_ctl_bash.
Reading configuration using /data/opentenbase/pgxc_ctl/pgxc_ctl_bash --home /data/opentenbase/pgxc_ctl --configuration /data/opentenbase/pgxc_ctl/pgxc_ctl.conf
Finished reading configuration.
   ******** PGXC_CTL START ***************

Current directory: /data/opentenbase/pgxc_ctl
PGXC clean all


[opentenbase@localhost ~]$ pgxc_ctl
/usr/bin/bash
Installing pgxc_ctl_bash script as /data/opentenbase/pgxc_ctl/pgxc_ctl_bash.
Installing pgxc_ctl_bash script as /data/opentenbase/pgxc_ctl/pgxc_ctl_bash.
Reading configuration using /data/opentenbase/pgxc_ctl/pgxc_ctl_bash --home /data/opentenbase/pgxc_ctl --configuration /data/opentenbase/pgxc_ctl/pgxc_ctl.conf
Finished reading configuration.
   ******** PGXC_CTL START ***************

Current directory: /data/opentenbase/pgxc_ctl
PGXC init all
Initialize GTM master
EXECUTE DIRECT ON (dn002) 'ALTER NODE dn002 WITH (TYPE=''datanode'', 	HOST=''10.240.138.159'', PORT=40004, PREFERRED)';
EXECUTE DIRECT
EXECUTE DIRECT ON (dn002) 'SELECT pgxc_pool_reload()';
 pgxc_pool_reload
------------------
 t
(1 row)

Done.
查看集群状态
当发现上面的输出时,集群已经 OK,另外也可以通过 pgxc_ctl 工具的monitor all命令来查看集群状态
[opentenbase@localhost ~/pgxc_ctl]$ pgxc_ctl
/usr/bin/bash
Installing pgxc_ctl_bash script as /data/opentenbase/pgxc_ctl/pgxc_ctl_bash.
Installing pgxc_ctl_bash script as /data/opentenbase/pgxc_ctl/pgxc_ctl_bash.
Reading configuration using /data/opentenbase/pgxc_ctl/pgxc_ctl_bash --home /data/opentenbase/pgxc_ctl --configuration /data/opentenbase/pgxc_ctl/pgxc_ctl.conf
Finished reading configuration.
   ******** PGXC_CTL START ***************

Current directory: /data/opentenbase/pgxc_ctl
PGXC monitor all
Running: gtm master
Not running: gtm slave
Running: coordinator master cn001
Running: coordinator master cn002
Running: datanode master dn001
Running: datanode slave dn001
Running: datanode master dn002
Not running: datanode slave dn002
一般的如果配置的不是强同步模式,gtm salve,dn slave 的故障不会影响访问。
- 集群访问 访问 OpenTenBase 集群和访问单机的 PostgreSQL 基本上无差别,我们可以通过任意一个 CN 访问数据库集群:例如通过连接 CN 节点 select pgxc_node 表即可查看集群的拓扑结构(当前的配置下备机不会展示在 pgxc_node 中),在 Linux 命令行下通过 psql 访问的具体示例如下
[opentenbase@localhost ~/pgxc_ctl]$ psql -h 10.215.147.158 -p 30004 -d postgres -U opentenbase
psql (PostgreSQL 10.0 opentenbase V2)
Type "help" for help.

postgres=# \d
Did not find any relations.
postgres=# select * from pgxc_node;
 node_name | node_type | node_port |   node_host    | nodeis_primary | nodeis_preferred |  node_id   | node_cluster_name
-----------+-----------+-----------+----------------+----------------+------------------+------------+-------------------
 gtm       | G         |     50001 | 10.215.147.158 | t              | f                |  428125959 | opentenbase_cluster
 cn001     | C         |     30004 | 10.215.147.158 | f              | f                | -264077367 | opentenbase_cluster
 cn002     | C         |     30004 | 10.240.138.159 | f              | f                | -674870440 | opentenbase_cluster
 dn001     | D         |     40004 | 10.215.147.158 | t              | t                | 2142761564 | opentenbase_cluster
 dn002     | D         |     40004 | 10.240.138.159 | f              | f                |  -17499968 | opentenbase_cluster
(5 rows)
- 使用数据库前需要创建 default group 以及 sharding 表
OpenTenBase 使用 datanode group 来增加节点的管理灵活度,要求有一个 default group 才能使用,因此需要预先创建;一般情况下,会将节点的所有 datanode 节点加入到 default group 里 另外一方面,OpenTenBase 的数据分布为了增加灵活度,加了中间逻辑层来维护数据记录到物理节点的映射,我们叫 sharding,所以需要预先创建 sharding,命令如下:
postgres=# create default node group default_group  with (dn001,dn002);
CREATE NODE GROUP
postgres=# create sharding group to group default_group;
CREATE SHARDING GROUP
- 创建数据库,用户,创建表,增删查改等操作
至此,就可以跟使用单机数据库一样来访问数据库集群了
postgres=# create database test;
CREATE DATABASE
postgres=# create user test with password 'test';
CREATE ROLE
postgres=# alter database test owner to test;
ALTER DATABASE
postgres=# \c test test
You are now connected to database "test" as user "test".
test=> create table foo(id bigint, str text) distribute by shard(id);
CREATE TABLE
test=> insert into foo values(1, 'tencent'), (2, 'shenzhen');
COPY 2
test=> select * from foo;
 id |   str
----+----------
  1 | tencent
  2 | shenzhen
(2 rows)
- 停止集群
通过 pgxc_ctl 工具的 stop all 命令来停止集群,stop all 后面可以加上参数 -m fast 或者是 -m immediate 来决定如何停止各个节点。
PGXC stop all -m fast
Stopping all the coordinator masters.
Stopping coordinator master cn001.
Stopping coordinator master cn002.
Done.
Stopping all the datanode slaves.
Stopping datanode slave dn001.
Stopping datanode slave dn002.
pg_ctl: PID file "/data/opentenbase/data/dn002/postmaster.pid" does not exist
Is server running?
Stopping all the datanode masters.
Stopping datanode master dn001.
Stopping datanode master dn002.
Done.
Stop GTM slave
waiting for server to shut down..... done
server stopped
Stop GTM master
waiting for server to shut down.... done
server stopped
PGXC monitor all
Not running: gtm master
Not running: gtm slave
Not running: coordinator master cn001
Not running: coordinator master cn002
Not running: datanode master dn001
Not running: datanode slave dn001
Not running: datanode master dn002
Not running: datanode slave dn002
启动集群
通过 pgxc_ctl 工具的start all命令来启动集群
[opentenbase@localhost ~]$ pgxc_ctl
/usr/bin/bash
Installing pgxc_ctl_bash script as /data/opentenbase/pgxc_ctl/pgxc_ctl_bash.
Installing pgxc_ctl_bash script as /data/opentenbase/pgxc_ctl/pgxc_ctl_bash.
Reading configuration using /data/opentenbase/pgxc_ctl/pgxc_ctl_bash --home /data/opentenbase/pgxc_ctl --configuration /data/opentenbase/pgxc_ctl/pgxc_ctl.conf
Finished reading configuration.
   ******** PGXC_CTL START ***************

Current directory: /data/opentenbase/pgxc_ctl
PGXC start all
- 结语 本文档只是给用户一个简单的指引,演示如何从源码开始,一步一步搭建一个完整的 OpenTenBase 集群,后续会有更多的文章来介绍 OpenTenBase 的特性使用,优化,问题定位等内容。